
About
The Pleebie Jeebies Rotating and Flashing Light asset can control a light or object in many ways. This provides a simple way to add an alarm, siren, or emergency lighting to a scene. It also allows you to change the color of the lighting or control the light how you please, allowing the creator to invent their own uses for this asset.
The main functions of this asset are:
- Control any number of lights to rotate, flash, or change colors
- Change an object’s mesh material to match lights being toggled or changing color
- Control a game object to rotate in a direction of choice
- Control an audio source to work with the light or object
NOTE: The functionality of this asset will work in any Unity Rendering Pipeline, but some extra setup may be required for mesh material changes. Some Built-in Rendering Pipeline (BRP) and Universal Rendering Pipeline (URP) materials and prefabs are provided, but for other pipelines or if the ones provided aren’t desired, new ones will have to be created.
Asset Files Hierarchy
All files are located under Assets/PleebieJeebies/ RotatingAndFlashingLight/ (no spaces)
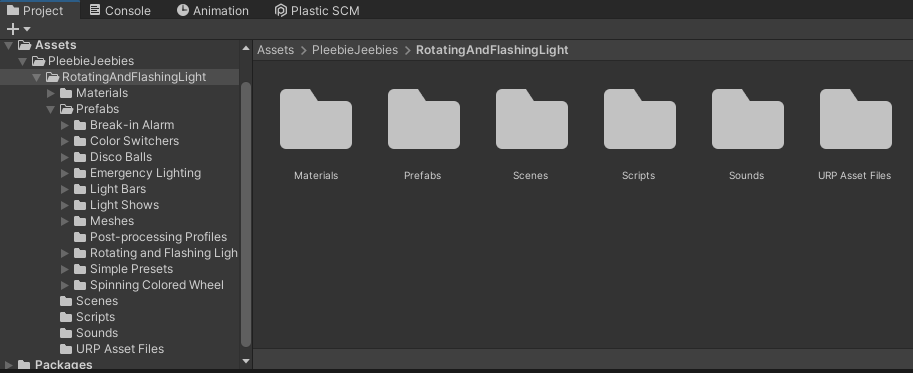
Materials Folder
Inside the Materials/ folder, you will find two sets of Unity Materials, one for the Built-in Rendering Pipeline (BRP) and another for the Universal Rendering Pipeline (URP). If needed, Materials for other pipelines will have to be created, but the existing ones can be used as a reference. These Unity Materials are used to change the coloring of the Unity Mesh Renderer of any object set. There is a set of all the main colors with a transparency effect in two variants, one Emissive and other non-Emissive. These are and can be used to simulate the actual light object to look like it’s on or off. Go to Configuration for more detail on this asset or How to Set Up Your Own Prefab to see how to set up and use this asset.
Prefabs Folder
Inside the Prefabs/ folder you will find more folders containing low poly art style prefabs created with the idea to be used as templates or generate ideas for the user. These are also separated in to BRP and URP versions since different pipelines require different types of materials to be visible. These prefabs can be dragged and dropped in to any scene and work on their own or placed on to any prefab to add Unity Lights with the PJ_Rotating and Flashing Light script. For example is the Emergency Lighting folder which will contain multiple police lighting options, along with ambulance and fire truck ideas; put these on emergency vehicles and use them to have proper lighting. Or delete the mesh and use the Materials given to create your own design where the script controls the light. Other examples include: Break-in Alarm, Color Switchers, Disco Balls, Light Shows, Light Bars, Meshes, Rotating and Flashing Lights, Simple Presets, and Spinning Colored Wheel. There are also two Post-processing Profiles, one for BRP and another for URP which are used to create a bloom effect in their respective pipeline. See More Information for details about Post Processing.
Scenes Folder
Inside the Scenes/ folder are three demo scenes showing examples of prefabs being used. Two scenes which use the BRP prefab variants, one using default settings and the other with post processing applied, and the third scene which uses the URP prefab variants.
Scripts Folder
Inside the Scripts/ folder is the PJ_Rotating and Flashing Light script which is necessary for the functionality of this asset.
Sounds Folder
Inside the Sounds/ folder you will find royalty free mp3 files used in some of the prefabs to show how sounds can be controlled with the script. For example two types of police siren, ambulance siren, fire truck siren, and a break-in alarm.
URP Asset Files
Inside the URP Asset Files/ folder are the files I used when using URP as the selected rendering pipeline. These files can be altered in the inspector to change the graphic quality in various ways when using URP. If using your own URP asset files or any other rendering pipeline, these files can be ignored. See Unity’s URP overview for details about URP and how to use it in your own project.
Installation
- Download the asset inside the Unity Editor Package Manager window (Window > Package Manager from the Unity Editor toolbar)
- Import the asset package into the project
- See Configuration for more details about this asset, How to Set Up Your Own Prefab for how to use the asset in your project, or simply place a prefab in to your scene to see how it works
Configuration
Any of the prefabs will function by being dragged in to any scene or on to another prefab. This section will cover the variables used on the PJ_Rotating and Flashing Light script and prefabs to better understand how to configure the script and create your own prefabs.
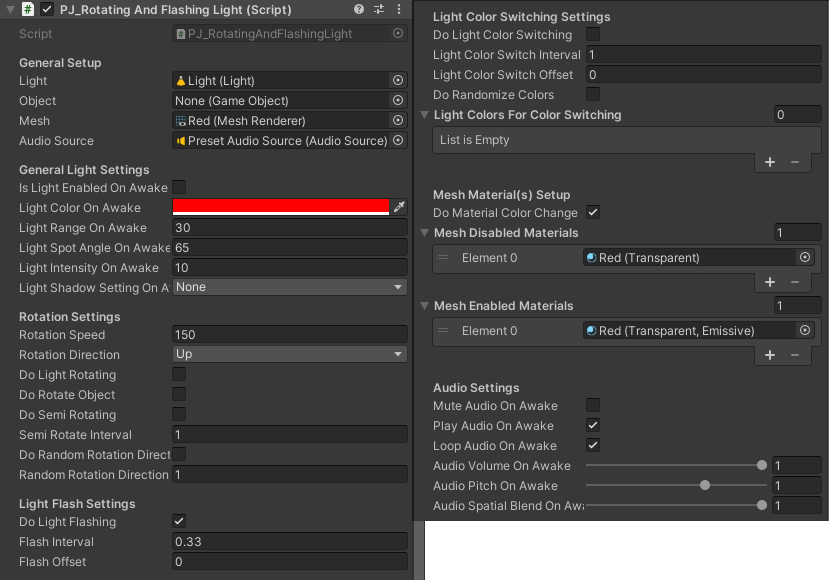
Light - The Unity Light Object to be controlled by this script; this must be set to control a light
Object - A Unity Game Object to be controlled by this script; this must be set to control an object
Mesh - Mesh renderer of an object to change material the same time the controlled light is toggled or changed color; must be set for Do Material Color Change to function
Audio Source - Controls an attached Audio Source to this script; must be set for the Audio Settings section to affect the Audio Source
Is Light Enabled On Awake - Toggle the controlled light starting on or off
Light Color On Awake - The color the controlled light will be set to on awake
Light Range On Awake - Set the controlled light's range on awake
Light Spot Angle On Awake - Set the controlled light's spot angle on awake
Light Intensity On Awake - Set the controlled light's intensity on awake
Light Shadow Setting On Awake - Set the controlled light's shadow setting on awake; can be off, soft, or hard shadows. See Unity LightShadows for more information
Rotation Speed - Amount of rotation per second affecting the controlled light or object (360 is one rotation per second)
Rotation Direction - 3D Direction the light or object will rotate towards using Vector3
Do Light Rotating - Toggle the controlled light to rotate or not
Do Object Rotating - Toggle the controlled object to rotate or not
Do Semi Rotating - Toggle whether or not to do semi rotations on a set interval; affects both light and object rotation
Semi Rotate Interval - Amount of time before switching directions for a semi rotation
Do Random Rotation Direction - Toggle whether or not to change the controlled light's rotation direction to a random Direction on a set interval; works with normal and semi rotation; affects both light and object rotator
Random Rotation Direction Interval - Amount of time before the next random Direction selection
Do Light Flashing - Toggle the controlled light to flash or not on a set interval
Flash Interval - Amount of time before the controlled light flashes to on or off
Flash Offset - Amount of time before the controlled light begins the flash interval
Do Light Color Switching - Toggle the controlled light to change colors set in the variable Light Colors For Color Switching changing on a set interval
Light Color Switch Interval - Amount of time before the controlled light changes color
Light Color Switch Offset - Amount of time before the controlled light begins the color switch interval
Do Randomize Colors - Setting this true will select the next color from the series at random, otherwise it will go in the order set starting from 0 (or top down)
Light Colors for Color Switching - Colors used to switch to when Do Light Color Switching is toggled on
Do Material Color Change - Toggle Mesh Renderer material to change with the light toggling or changing color (requires Mesh, Mesh Disabled Materials, and Mesh Enabled Materials to be setup)
Mesh Disabled Materials - Material/Color the mesh will take upon the light being disabled; if used with Do Light Color Switching, the material colors should closely match the ones used in Light Colors For Color Switching
Mesh Enabled Materials - Material/Color the mesh will take upon the light being enabled; if used with Do Light Color Switching, the material colors should closely match the ones used in Light Colors For Color Switching
Mute Audio On Awake - Toggle the controlled Audio Source to be muted on awake
Play Audio On Awake - Toggle the controlled Audio Source to play on awake
Loop Audio On Awake - Toggle the controlled Audio Source to loop on awake
Audio Volume On Awake - Set the volume of the controlled Audio Source on awake
Audio Pitch On Awake - Set the pitch of the controlled Audio Source on awake
Audio Spatial Blend On Awake - Set the spatial blend of the controlled Audio Source to be 2D or 3D on awake
NOTE: This may seem like a lot of variables, but most are for small tweaks to get the exact functionality desired. See How to Set Up Your Own Prefab on how to set up your own prefab.
How to Set Up Your Own Prefab
You may discover the defined prefabs are not to your liking and you would like to set up your own version of the script. This section will cover how to do so.
- Under Prefabs/Simple Presets/ there are some building blocks which can be used to start your creation. There is spot light, point light, and audio source presets which can be dragged or customized to your liking. There are also some quick script presets such as a simple flashing and/or rotating light to get started.
- If you would like to start fresh, simply add the script component PJ_RotatingAndFlashingLight to any object you have in your scene. Most commonly, I prefer to have this script on a parent object of the light or object I am wanting to control, but this is not required.
- Once you have your script component added, you can begin to add the objects you wish to be controlled under the General Setup section. Simply drag any Light or Game Object in to the Light or Object variable in the inspector so the script knows which should be controlled. You can also drag the object’s Mesh Renderer used to represent where the light is coming from in to the Mesh variable as it is necessary to change the material of the mesh with the light. In addition, you can also add an audio source to the variable if you wish that to be controlled.
- From here you can get creative. Once your objects are set up, you can go through the list of variables on the script component and decide what you would like your set controlled objects to do.
General Setup - This section is referred to in the above list item #3. At least one of the variables in this section must be filled for the script to function in some way.
General Light Settings - This section is for deciding the light settings of the controlled light; whether the light will start on or off, the initial color of the light, or how far, wide, or intense the controlled light will be. You can also set whether or not the light will cast shadows, which can be useful for mobile applications when resources are tight.
Rotation Settings - This section is for all settings related to rotation affecting the controlled light and/or object. Turn rotation on or off specifically for the light or object, decide the speed and direction of the rotation, or set the rotation to be only a semi rotation allowing it to go back and forth on a set interval. Finally there is an option for random rotation which will change the direction of the rotation to a random direction on a set interval.
Light Flash Settings - This section is to set whether or not the controlled light will flash on the set interval. You can also set an offset which will wait for the set time before starting the flash interval.
Light Color Switching Settings - This section is for setting the controlled light to change colors on a set interval. Colors can be pre-set on the list Light Colors for Color Switching, when Do Light Color Switching is toggled, the controlled light will change in sequence starting from the top of the list on the set interval. This sequence can also be randomized or be set to wait with an offset.
Mesh Materials Setup - This section is for deciding whether or not the object chosen as the controlled light’s mesh will have its material change with the light turning on or off or changing color. If desired, Do Material Color Change must be toggled, along with the Mesh Enabled/Disabled Materials lists be set to the materials desired. If used with Do Light Color Switching, the material colors chosen should closely match the ones used in Light Colors For Color Switching. There is a folder of materials given which can be used to fill these lists. See Asset Files Hierarchy for more information on Materials or the last tip in Tips, Extras, and Notes for a Unity Editor tip on how to fill the materials lists quickly.
Audio Settings - This section is for deciding the settings of the controlled audio source, if set. The audio can be set to be muted or played when appearing on the scene. It can also be looped, as well as have the volume or pitch changed for each audio source. Finally the spatial blend can be chosen which will determine if the audio can be heard throughout the entire scene or in a local 3D area. Click to read more about Unity Audio Sources and spatial blend.
NOTE: The script component PJ_RotatingAndFlashingLight can be added to a game object as many times as desired; in fact, it is suggested for being able to control multiple lights or game objects at one time. Each script component can control one light, one game object, one object mesh, and one audio source. More components must be added per light or object wanting to be controlled.
More Information
Lighting and graphics in Unity can vary quite a bit depending on the pipeline and settings used. This asset will function in any pipeline, but may require some setup if wanting to switch a rendering mesh material along with the light. Some default BRP and URP materials are provided, but for other pipelines or if the ones provided aren’t desired, new ones will have to be created. In addition, Post Processing in any pipeline can make a big difference when wanting to make your scene look more realistic.
The scenes provided with this asset give examples of post processing used in the BRP or URP as post processing is setup differently for each pipeline. Profiles are also provided if you already have post processing setup on your scene.
Click for more information about Unity Lighting, Unity Graphics, Unity Rendering Pipelines, Unity Materials, Unity Material Emission, Post Processing, and Post Processing Bloom.
The script for the functionality of this asset does not have any error handling and this is intentional. Otherwise, the console would fill up with possible warnings and errors in cases where nothing is wrong as this script is very versatile. I decided a clean console is better than random garbage. This documentation is very detailed to attempt to reduce the case in which errors are thrown. If an error is thrown, it is likely because the General Setup section was not filled properly. See Configuration for more on individual settings or How to Set Up Your Own Prefab for more information or how to setup the script component properly.
NOTE: Colliders have been omitted from every prefab, so add them if they are desired.
Tips, Extras, and Notes
This section will cover any tips for when working with the Unity Editor and/or this asset. These tips are not in any particular order and may or may not be helpful.
The following image shows an example of how this asset’s class controller can be used to apply changes to every object using this script in a scene. It also shows how to set a specific object to a script and control that object via code.
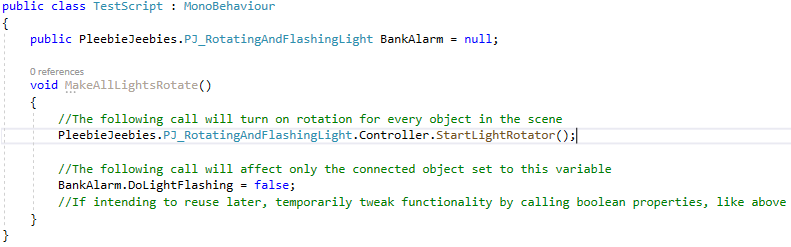
Method calls are provided in cases where you would like to start one of the functions of this asset via code. Using the same logic from the code snippet above, you can call and start each main function with the following methods: StartLightRotator (), StartObjectRotator(), StartLightFlasher (), and StartLightColorSwitcher(). This asset uses co-routines, so in cases where you would like to stop all script functions there is a method named KillAllCoroutines(). To free resources, the kill method is called when the object using the script component is destroyed, so no need to call it unless desired.
NOTE: All Boolean and timer/interval variables can be changed during runtime which can be useful in testing or when changing properties in code. All other variables in the script are used during startup (on Awake) and nothing will happen if these are changed at runtime.
In the Unity Editor, you can change the rendering of lighting to be better or worse by going to: Edit > Project Settings > Quality OR Graphics
NOTE: at lower quality or graphic settings, some lights may not appear as desired as Unity can only render a certain number of lights depending on different settings. Less settings will be available when using anything other than the built-in rendering pipeline. These extra missing settings will be in the specific pipeline’s asset files.
When using other pipelines, lights have different settings and appearances and will require different settings to appear similarly to the BRP variant.
The alpha channel when picking a color on lights doesn’t affect the transparency as I imagine this is simulated via the intensity or brightness of the light. For this reason, there is also no black light and why darker colors have been omitted from the default materials provided.
Prefabs/Presets have been provided for a quick start when wanting to simply put something in a scene or on another prefab, but if only the functionality is desired for use on one of your own prefabs, you can copy the component in the inspector and paste component values anywhere else. You’ll simply just have to refill the General Setup section of the component with your own objects. For more info on Using Components in Unity.
You can place a prefab in a scene, then right click the prefab object in scene view > prefab > unpack completely to be able to edit whatever you want from the prefab and reuse individual parts as you see fit.
When trying to link multiple objects (or materials) to a list in the inspector, you can save time by pressing the lock button on the top right of the inspector. This will lock the inspector to the current item you are focused on. Now hold CTRL and begin clicking the items you’d like added to the list. Once all desired items are selected, drag them to the list in the inspector and see the list populate with all the items. It even keeps it in the order of the way you selected it.NOTE: Don’t forget to click the lock button again otherwise the inspector will stay locked to the focused object you locked it to.
If you are experiencing any issues, contact our support team at: support@pleebiejeebies.com